Easy 3-Ingredient No-Bake Twix Cookie Bites: Your Ultimate Guide to Chocolate Caramel Bliss
Are you craving the classic combination of shortbread, chewy caramel, and rich chocolate, but don’t want to spend hours baking? Look no further! These **Twix Cookie Bites** are an absolute revelation, transforming simple pantry staples into a delightful, bite-sized dessert that captures the essence of your favorite candy bar. Made effortlessly with just three main ingredients – mini Nilla wafer cookies, Rolo chocolates, and your choice of melting chocolate – these treats are perfect for satisfying a sweet tooth, whipping up for an unexpected gathering, or adding a touch of homemade charm to any dessert platter.

We’re absolutely smitten with these simple, bite-sized delights! The Rolos are the secret to their fantastic chewy caramel center, perfectly complemented by the crisp texture of Nilla wafers. Once these are assembled, a generous dip in smooth, melted chocolate brings all the classic Twix flavors together in a truly irresistible package. The beauty of this recipe lies in its simplicity and the speed with which you can create a batch of these delectable confections. They require minimal effort and virtually no baking, making them an ideal project for even novice bakers or those with limited time.
Why You’ll Adore This Easy Twix Bites Recipe
There are countless reasons why these chocolate caramel cookie bites will become a staple in your recipe collection:
- **Just 3 Core Ingredients!** You heard that right. All you need are mini Nilla Wafers, Rolos, and a chocolate coating. It’s incredibly straightforward, cutting down on shopping time and expense.
- **Effortless and No-Fuss:** Forget complicated steps and long ingredient lists. This recipe is designed for maximum flavor with minimum fuss. It’s a fantastic option when you need a quick dessert.
- **Lightning Fast Preparation:** You can whip up a batch of these delightful treats in well under an hour, including the brief chill time. This makes them perfect for last-minute cravings or spontaneous entertaining.
- **Classic Twix Flavor, Reinvented:** Enjoy the iconic combination of crispy cookie, gooey caramel, and rich chocolate without the need for intricate baking. Each bite delivers that familiar, satisfying taste.
- **Perfectly Bite-Sized:** Their small size makes them ideal for portion control, sharing at parties, or simply enjoying as a little indulgence. They’re also incredibly easy to serve and eat.
- **Kid-Friendly Fun:** The assembly process is simple enough for children to help with, making it a wonderful activity for families. Kids will love placing the Rolos and wafers together, and of course, dipping them in chocolate!
- **Versatile for Any Occasion:** Whether it’s a birthday party, a holiday gathering, a potluck, or just a quiet evening at home, these Twix Cookie Bites fit right in. They’re always a crowd-pleaser and disappear quickly.
Ingredients You’ll Need for Your Twix Cookie Bites
Gathering your ingredients for these delightful no-bake cookies is incredibly simple. Here’s exactly what you’ll need to create about 35 delicious bites:
- **Approximately 70 Mini Nilla Wafer Cookies:** It’s crucial to select the *mini* Nilla wafers, not the full-sized ones. Their smaller diameter is perfect for sandwiching the Rolos and creating that authentic bite-sized experience. The vanilla flavor of these wafers provides the ideal “shortbread” base for our Twix-inspired treat. If Nilla wafers are unavailable, small shortbread cookies or even mini digestive biscuits could be used as an alternative, though the flavor profile might differ slightly.
- **Approximately 35 Unwrapped Rolos:** A standard 7 oz bag usually contains just the right amount for this recipe. Rolos are key for that iconic, chewy caramel center that defines the Twix experience. Ensure they are completely unwrapped before you begin, as this will save you time during assembly. If you’re struggling to find Rolos, individual soft caramel squares (cut in half or quartered to fit the wafers) can work as a substitute, but Rolos provide a specific gooey texture when warmed.
- **24 oz Chocolate Almond Bark (or preferred melting chocolate):** This is where you have a bit of choice! Almond bark is often the most budget-friendly option and melts easily, providing a smooth coating. However, it’s important to note that almond bark isn’t technically “chocolate” but rather a confectionary coating. For a superior chocolate flavor, consider using high-quality melting chocolate wafers or even good quality semi-sweet chocolate chips. We’ll discuss the pros and cons of each in more detail below to help you make the best choice for your palate and budget.

Mastering the Chocolate Dip: Essential Tips for Coating Your Cookies
Dipping cookies in chocolate might seem intimidating, but with a few simple techniques, you can achieve a professional-looking, smooth finish every time. Here’s what you need to know:
Choosing Your Chocolate Coating: Taste vs. Budget vs. Ease
- Almond Bark: This is generally the most economical choice. It melts beautifully, yielding a very smooth and shiny coating that sets quickly. However, its flavor profile is mild and doesn’t offer the rich complexity of true chocolate, as it’s a confectionary coating made with vegetable fats. It’s excellent for ease and appearance.
- Dipping Chocolate Wafers (Candy Melts): These wafers, often found in craft or baking stores, are designed specifically for melting and dipping. They taste significantly better than almond bark and come in various colors, but they are typically twice the price. They offer a great balance of flavor and ease of use.
- Chocolate Chips (Semi-Sweet, Milk, or Dark): For the best flavor, high-quality chocolate chips are an excellent option. However, chocolate chips contain stabilizers that prevent them from melting as smoothly as bark or wafers, which can make dipping challenging. To achieve a thinner, more dippable consistency and a smoother finish, add about ½ to 1 teaspoon of shortening (like Crisco) or coconut oil per cup of chocolate chips. This helps to emulsify the chocolate and improve its flow.
The Art of Melting Chocolate: Slow and Gentle is Key
Regardless of your chocolate choice, slow and gentle melting is paramount to prevent burning or seizing. Here’s a foolproof microwave method, or a stovetop alternative:
Microwave Method:
- Break your chocolate bark or wafers into smaller, uniform squares or pieces. Place them in a microwave-safe bowl.
- Microwave on high for 1 minute. Do not stir immediately.
- Let the chocolate sit in the microwave (or on the counter) for 2 minutes. The residual heat will continue to melt the chocolate.
- After 2 minutes, stir gently with a rubber spatula until smooth. If there are still lumps, microwave for another 30-45 seconds.
- Again, let it sit for 2 minutes, then stir gently until completely smooth. Avoid over-microwaving, as this can burn the chocolate and make it gritty.
Double Boiler Method (Stovetop):
If you prefer stovetop melting, use a double boiler. Fill a saucepan with about an inch of water and bring it to a simmer. Place a heat-proof bowl (that fits snugly over the saucepan without touching the water) with your chocolate pieces over the simmering water. Stir constantly until the chocolate is fully melted and smooth. This method provides more control over the melting temperature.
Tools for Effortless Dipping
While using two forks is perfectly fine for dipping, if you find yourself frequently dipping treats in chocolate, you might consider investing in some specialized dipping tools. These tools, often wire loops or prongs, significantly simplify the process. They help you dip treats faster, achieve a more even coating, use less chocolate by allowing excess to drip off easily, and overall, make the entire process much smoother and cleaner. They are a small investment for a big improvement in your confectionery projects!
Tips for a Perfect Coat:
- **Work with a warm, not hot, chocolate:** Allow your melted chocolate to cool slightly but remain fluid. Overly hot chocolate can be too thin and may not coat evenly, or it might melt the Rolo further.
- **Tap off excess:** After dipping, lift the cookie and gently tap it against the side of the bowl or against your wrist a few times. This helps any excess chocolate drip off, ensuring a thinner, neater coating and preventing “feet” of chocolate from forming around the base.
- **Re-melt as needed:** If your chocolate starts to thicken during dipping, briefly microwave it for 10-15 seconds and stir, or place it back over the double boiler for a moment.


Twix Cookie Bites
Twix Cookie Bites made easy with Nilla wafer cookies, Rolo chocolates and almond bark! No-bake chocolate caramel cookies with classic Twix flavor.
Pin
Rate
Course: Cookies, Dessert
Cuisine: American
Keyword: Twix Cookie Bites, no bake, chocolate caramel
Prep Time: 15 minutes
Cook Time: 1 minute
Chill Time: 20 minutes
Total Time: 36 minutes
Servings: 35
Calories: 195 kcal
Author: Jessica & Nellie
Ingredients
- 70 mini nilla wafer cookies
- 35 unwrapped Rolos
- 24 oz chocolate almond bark (or melting chocolate)
Instructions
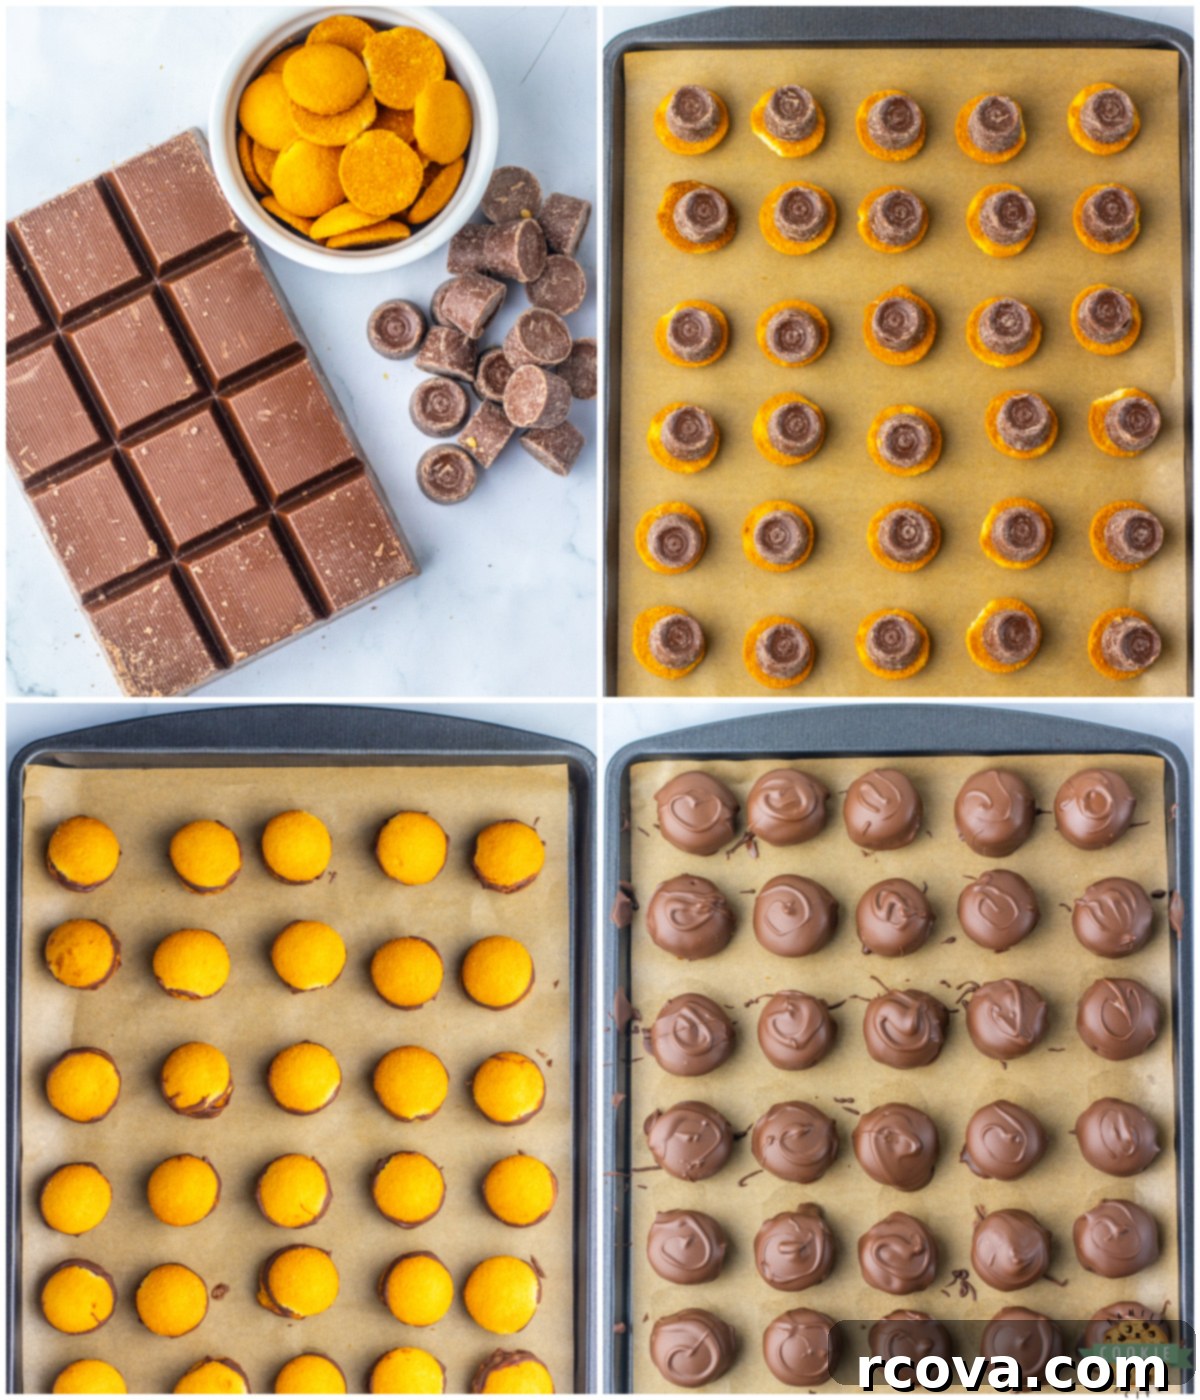
- Preheat the oven to 300°F (150°C) and line a large baking sheet with parchment paper. This parchment paper will prevent sticking and make cleanup a breeze. Carefully place 35 mini Nilla wafers on the sheet pan, leaving a little space between each. Then, gently place one unwrapped Rolo on top of each cookie, ensuring it’s centered.
- Place the baking sheet into the preheated oven for exactly 1 minute and 30 seconds. This brief warming period is crucial for softening the Rolos just enough to make them pliable without fully melting them. Remove the sheet from the oven and immediately place another mini Nilla wafer on top of each softened Rolo, gently pressing down to sandwich the caramel and create a cookie-Rolo-cookie stack.
- Once all the cookies are assembled, transfer the baking sheet to the refrigerator and chill for at least 20-30 minutes. This step allows the Rolos to firm up again and helps the cookie sandwiches set, making them much easier to handle and dip in chocolate.
- While the cookies are chilling, prepare your chocolate coating. Melt the almond bark (or your chosen melting chocolate) in a microwave-safe bowl. Start by microwaving for 1 minute, then stir gently. Heat for another 30-45 seconds, stirring again until the chocolate is completely smooth and free of lumps. Alternatively, use the double boiler method for controlled melting.
- Once the cookies are chilled and firm, and the chocolate is perfectly melted, begin dipping. Place one of the Rolo-filled cookies into the melted chocolate. Use two forks or a specialized dipping tool to flip the cookie, ensuring all sides are completely coated in chocolate. Lift the cookie out and lightly tap the forks or tool against the edge of the bowl to allow any excess chocolate to drip off, ensuring a thin, even coating.
- Carefully place the chocolate-coated cookie back onto the parchment-lined baking sheet. Repeat this process until all of the Twix Cookie Bites are coated. If desired, immediately after dipping, you can sprinkle with sea salt, chopped nuts, or festive sprinkles for extra flair. Once hardened (this typically takes about 5-10 minutes at room temperature, or faster if placed back in the refrigerator for a few minutes), you can drizzle a bit more melted chocolate over the tops for a decorative finish. Enjoy your homemade Twix treats!
Notes
Storage: Store any leftover Twix Cookie Bites in an airtight container at room temperature on the counter for up to a week. Ensure they are kept in a cool, dry place away from direct sunlight to prevent the chocolate from melting.
Freezing: For longer storage, these cookies can be frozen for up to 1 month. Place them in a single layer on a parchment-lined tray to freeze solid, then transfer to a freezer-safe, airtight container or bag, separating layers with parchment paper. Thaw at room temperature before serving.
Nutrition
Calories: 195kcal |
Carbohydrates: 27g |
Protein: 1g |
Fat: 9g |
Saturated Fat: 7g |
Polyunsaturated Fat: 1g |
Monounsaturated Fat: 1g |
Trans Fat: 0.03g |
Cholesterol: 1mg |
Sodium: 65mg |
Potassium: 21mg |
Fiber: 0.2g |
Sugar: 22g |
Vitamin A: 7IU |
Vitamin C: 0.1mg |
Calcium: 9mg |
Iron: 0.03mg
Tried this recipe?
Mention @familycookierecipes or tag #familycookierecipes!
Storage & Freezing Instructions for Your Cookie Bites
Ensuring your delicious Twix Cookie Bites stay fresh and tasty is simple with proper storage. For short-term enjoyment, you can store these cookie bites in an airtight container on your countertop for up to a week. It’s best to keep them in a cool, dry place away from direct sunlight or heat sources, as this can cause the chocolate coating to soften or melt. If your kitchen tends to be warm, storing them in the refrigerator might be a better option, though the cookies will be firmer when chilled.
For longer preservation, these delightful cookies can be frozen for up to 1 month. To freeze them effectively, first place the cooled and set cookie bites in a single layer on a baking sheet lined with parchment paper. Freeze them for about an hour or until they are solid. This prevents them from sticking together. Once individually frozen, transfer the solid cookie bites to a freezer-safe, airtight container or a heavy-duty freezer bag. You can stack them in layers, using parchment paper between each layer to prevent sticking. When you’re ready to enjoy them, simply remove the desired number of cookies from the freezer and let them thaw at room temperature for about 15-30 minutes until soft enough to eat. Freezing them makes them an excellent make-ahead dessert for future gatherings or unexpected cravings.

Customization and Variations: Make Them Your Own!
While the classic Twix Cookie Bites are fantastic as is, this recipe offers a wonderful foundation for creativity. Don’t hesitate to experiment with different ingredients and additions to suit your taste or the occasion:
- Cookie Base Alternatives: Instead of Mini Nilla Wafers, you could try mini shortbread cookies, graham cracker squares (broken to size), or even small vanilla or chocolate biscuits for a different texture and flavor profile.
- Caramel Candy Swaps: If Rolos aren’t available, or you’re looking for a different caramel experience, consider using soft caramel squares (like Kraft Caramels) cut into appropriate sizes, or even mini caramel cups if you can find them. Just be sure to warm them gently to soften.
- Chocolate Coating Varieties: While milk chocolate is traditional, dark chocolate provides a richer, more intense flavor, perfect for those who enjoy a bittersweet note. White chocolate can also be used for a sweeter, creamier coating, or even colored candy melts for festive occasions.
- Exciting Toppings: Elevate your Twix Bites with a sprinkle of sea salt immediately after dipping for a delicious sweet and salty contrast. Other great toppings include chopped nuts (pecans, peanuts, almonds), shredded coconut, colorful sprinkles, a drizzle of contrasting white or dark chocolate, or even a dusting of cocoa powder.
- Flavor Extracts: Add a few drops of peppermint extract, orange extract, or almond extract to your melted chocolate for a delightful twist on the classic flavor.
More Irresistible Chocolate Caramel Cookies & Desserts
If you’re as big a fan of the delightful chocolate and caramel combination as we are, you’ll be thrilled to explore more recipes that deliver on that classic, gooey goodness. These treats are perfect for expanding your repertoire and satisfying every craving:
- Twix Cookie Cups: Imagine adorable shortbread cups, each filled with a luscious layer of melted caramel and crowned with smooth chocolate. These are a sophisticated take on the Twix candy bar, offering a delightful texture contrast and rich flavor in every bite.
- Christmas Tree Twix Cookie Version: Get into the holiday spirit with a festive twist on your favorite candy! These Christmas Tree Twix cookies are perfect for holiday platters, cookie exchanges, or simply enjoying with a warm cup of cocoa. They bring seasonal cheer to an already beloved flavor combination.
- Caramel Brownie Cookies: Starting with the convenience of a cake mix, these incredibly soft and chewy cookies are generously stuffed with gooey, soft caramels. They offer the rich, fudgy taste of a brownie with an unexpected caramel surprise in the center, making them utterly irresistible.
- Stuffed Rolo Cookies: Take a beloved sugar cookie and elevate it by stuffing it with a classic Rolo chocolate caramel. As the cookie bakes, the Rolo melts into a gooey, sweet center that will delight anyone who bites into it.
- Chocolate Caramel Cake Mix Cookies: For chocolate lovers, this version is super similar to the Stuffed Rolo Cookies but made with a chocolate cake mix base! The result is a deeply chocolatey cookie with that same magical, melted caramel center, perfect for a quick and impressive dessert.
- Twix Cookie Bars: For those who love a dessert that feeds a crowd, these bars are a fantastic choice. They feature a tender, baked layer of shortbread cookie as the base, generously topped with a rich layer of caramels, and then finished with a smooth chocolate topping. Be sure to check out that incredibly gooey caramel layer – it’s pure decadence!
Conclusion: Your New Favorite No-Bake Treat!
These 3-ingredient No-Bake Twix Cookie Bites are more than just a recipe; they’re a game-changer for anyone who loves quick, delicious, and impressive desserts. With their perfect balance of crispy wafer, chewy caramel, and smooth chocolate, they capture the essence of a classic candy bar in an easy-to-make, bite-sized form. Whether you’re preparing for a party, looking for a simple snack, or just need a quick chocolate-caramel fix, these cookie bites are guaranteed to hit the spot. So gather your ingredients, follow these simple steps, and get ready to enjoy a truly delightful treat that will have everyone asking for the recipe!
Don’t forget to share your creations with us on social media using #familycookierecipes. Happy snacking!
