The Best Strawberry Thumbprint Cookies: A Classic Jam-Filled Delight
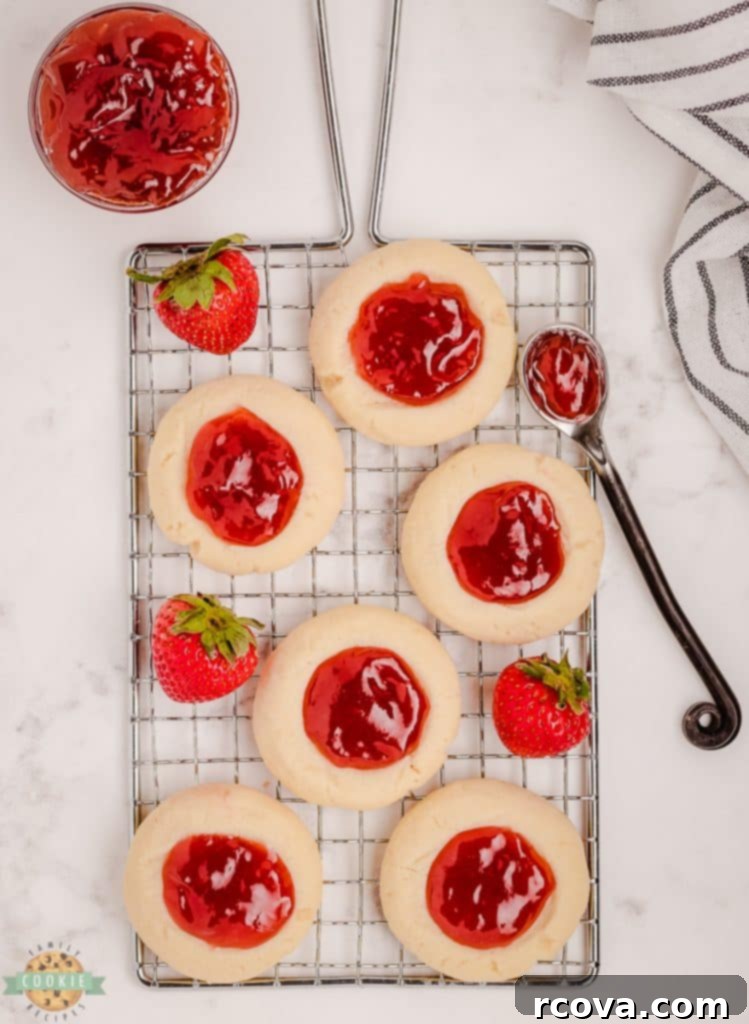
Indulge in the irresistible charm of Strawberry Thumbprint Cookies – a timeless treat known for its soft, buttery texture and a delightful, sweet strawberry jam center. These exquisite thumbprint cookies with jam are not just a dessert; they are an experience, promising to satisfy every sweet craving. Whether you’re preparing for a festive holiday gathering, a cozy family get-together, or simply seeking a personal moment of sugary bliss, these classic jam cookies are the perfect choice for any occasion.

Crafting these delectable strawberry jam thumbprint cookies requires only a handful of staple ingredients, likely already residing in your pantry. The cookie dough itself forms a rich, melt-in-your-mouth foundation, created with simple yet essential components like creamy butter, granulated sugar, all-purpose flour, and a touch of fragrant vanilla extract. This combination ensures a profoundly buttery and tender base that perfectly complements the vibrant, fruity burst from the strawberry jam filling. The interplay of the delicate cookie and the gooey, sweet jam creates a harmonious blend of textures and flavors that is truly unforgettable.
The Charming History of Thumbprint Cookies
The precise origins of thumbprint cookies are steeped in a bit of mystery, though culinary historians often trace their beginnings to Sweden in the early 1900s. Known there as “Hallongrotta” (which translates to “raspberry cave”), these charming cookies quickly became a beloved staple in Swedish baking. Their popularity soon spread across the Atlantic, gaining significant traction in the United States during the 1940s and 1950s. Since then, they have firmly established themselves as an enduring favorite in kitchens worldwide, cherished for their simplicity, versatility, and comforting appeal.
One of the most appealing aspects of classic thumbprint cookies is their incredible adaptability. While our recipe highlights the delightful flavor of strawberry jam, the possibilities for fillings are virtually endless. You can experiment with any type of fruit preserve or sweet spread that captures your imagination. Strawberry holds a special place in our hearts not only for its incredible taste but also for the beautiful, vibrant red hue it adds to the finished cookie, making it as visually appealing as it is delicious. Don’t let the simplicity of this cookie recipe fool you; its profound deliciousness must be experienced firsthand. We encourage you to try this easy recipe today and discover the magic of homemade shortbread cookies with jam!
Why You’ll Fall in Love with This Easy Thumbprint Cookie Recipe
These strawberry thumbprint cookies offer numerous reasons to become your new go-to cookie recipe:
- Chilling is Optional for Convenience: In many cookie recipes, chilling the dough is a mandatory step that can add significant time to your baking process. However, with this particular thumbprint cookie recipe, the chilling period is completely optional. This means you have the flexibility to either let the dough rest and develop deeper flavors (if you have the time), or you can dive straight into baking, allowing you to enjoy warm, fresh cookies much sooner. While chilling can enhance texture, this recipe is forgiving enough to produce delightful results even without it, making it perfect for those impromptu baking cravings.
- Unforgettable Delicious Flavor and Texture: Prepare your taste buds for an exceptional experience. These cookies boast a wonderfully buttery and crumbly texture that practically melts in your mouth, perfectly balanced by the sweet and intensely fruity flavor of the strawberry jam filling. The combination of the rich, tender cookie base and the vibrant, gooey jam creates an irresistible harmony, hitting just the right notes of sweet and tart. They are a truly gratifying snack or an elegant dessert that will leave everyone craving more.
- Remarkably Versatile and Customizable: This recipe serves as an excellent foundation for endless creative variations. While strawberry jam is a classic, feel free to personalize your cookies by using any type of jam, preserve, or even curd you prefer – raspberry, apricot, lemon, or even a rich chocolate ganache. Beyond the filling, you can also infuse the cookie dough with different flavor extracts like almond or lemon zest for an added aromatic dimension. Don’t be afraid to experiment with unique shapes or sizes for your thumbprints, allowing you to tailor these cookies to any theme or personal preference, making each batch uniquely yours.

Essential Ingredients for Strawberry Jelly Shortbread Cookies
Creating these delightful strawberry shortbread thumbprint cookies begins with a few essential ingredients. Each component plays a vital role in achieving that perfect buttery flavor and tender crumb:
- Unsalted Butter: You will need 1 cup (equivalent to 2 sticks) of unsalted butter, softened to room temperature. Room temperature butter is crucial for proper creaming with sugar, which helps create a light and airy cookie dough base.
- Granulated Sugar: ⅔ cups of granulated sugar not only sweetens the cookies but also contributes to their desired texture, ensuring they are tender and slightly chewy.
- Egg Yolks: Incorporating 2 egg yolks (without the whites) provides richness and helps to bind the ingredients together, resulting in a more tender cookie. The yolks also add a beautiful golden hue to the dough.
- Vanilla Extract: 1 teaspoon of pure vanilla extract is essential for enhancing the overall wonderful flavor profile of these classic cookies, adding a warm, aromatic depth.
- All-Purpose Flour: The structural foundation of these delicious cookies is 2 cups of all-purpose flour. Make sure to measure it correctly, either by weight or by spooning and leveling, to avoid dense cookies.
- Salt: A mere ½ teaspoon of salt might seem small, but it’s vital for balancing the sweetness and intensifying the rich flavors within the cookie dough, making them taste truly incredible.
- Strawberry Jam: ⅓ cup of your favorite strawberry jam will form the sweet, vibrant filling at the heart of each cookie. Choose a good quality jam for the best flavor.
How to Bake Perfect Strawberry Thumbprint Cookies
Follow these detailed steps to create a batch of perfect strawberry thumbprint cookies that are sure to impress:
Preparation Steps
Begin by preheating your oven to 375 degrees F (190 degrees C). This ensures the oven is at the correct temperature when your cookies are ready to bake, leading to even cooking. Next, prepare two baking sheets by lining them with parchment paper or silicone baking mats. This prevents sticking and makes for easy cleanup. Set these prepared sheets aside.
Crafting the Cookie Dough
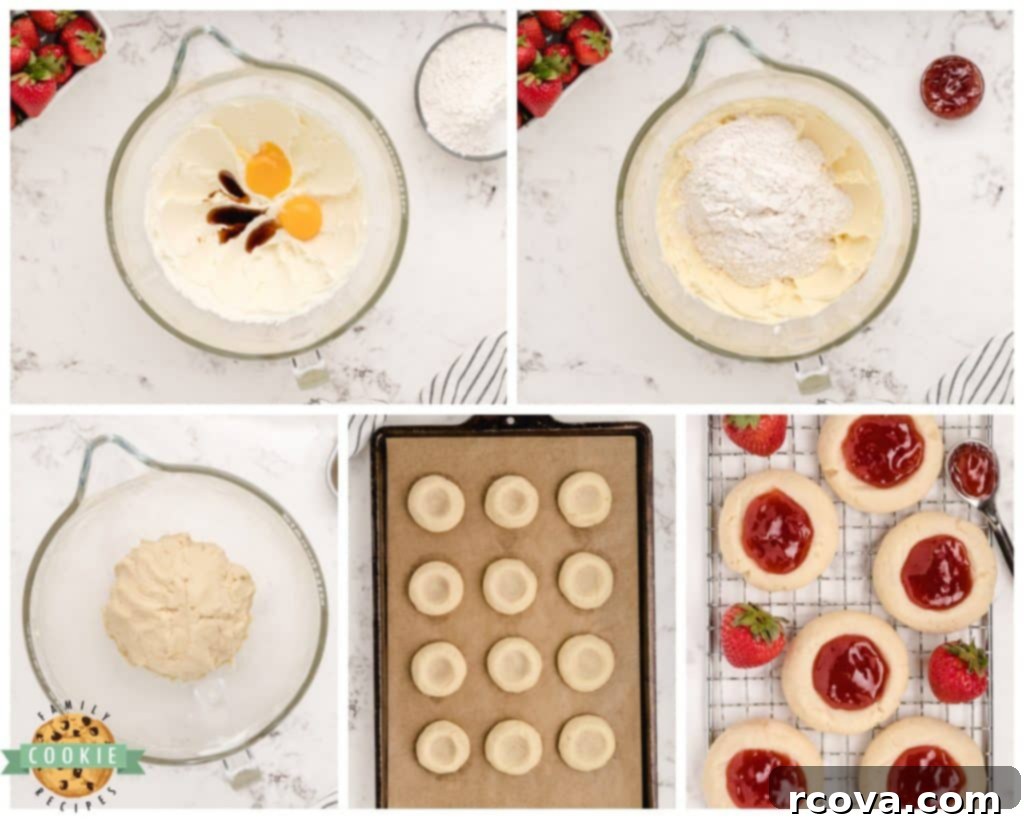
In a spacious mixing bowl, combine the softened butter and granulated sugar. Using an electric mixer set to medium-high speed, cream these two ingredients together until the mixture transforms into a pale, light, and wonderfully fluffy consistency. This process usually takes about 2 to 3 minutes, and proper creaming is key to a tender cookie. Following this, add the egg yolks and vanilla extract to the creamed mixture and beat until they are well incorporated and smooth.
Next, gradually add the all-purpose flour and salt to the wet ingredients. Mix on low speed until the dry ingredients are just incorporated, and the dough begins to come together into a soft ball. Be careful not to overmix, as this can lead to tough cookies.
If you choose to, you can chill the dough in the refrigerator for 30 minutes. While optional, chilling helps to firm up the butter, which can prevent the cookies from spreading too much during baking, resulting in a more defined shape and slightly chewier texture. If time allows, it’s a worthwhile extra step.

Shaping the Cookies
Once your dough is ready (chilled or not), gently roll it into perfectly round, 1-inch sized balls. Aim for uniformity to ensure even baking. Place these dough balls onto your prepared baking sheets, leaving a little space between each cookie.
To create the signature “thumbprint,” use the backside of a ½ teaspoon measuring spoon, or even your clean thumb, to press a gentle indent into the center of each cookie dough ball. This forms a small crater, which will later hold the delicious jam filling. Be careful not to press all the way through the dough.
Baking and Filling
Carefully place the baking sheets into your preheated oven and bake for 8 to 10 minutes. The edges of the cookies should be lightly set but not yet golden brown. They will be pale and soft when they first come out.
Remove the baking sheet from the oven. If any of the indents have risen or look too shallow, gently press them in again with your measuring spoon or thumb to redefine the crater. This is important to ensure enough space for the jam.
Next, spoon a small amount of strawberry jam into each indentation, filling it generously but not overflowing. The jam will slightly melt and settle during the final bake.
Return the cookie sheets to the oven and continue baking for an additional 3 to 4 minutes. During this second bake, the jam will melt slightly and become gooey, and the edges of the cookies will turn a delicate, light golden color. Keep a close eye on them to prevent over-browning.
Once baked, let the cookies cool on the baking sheet for about 5 minutes. This allows them to firm up slightly before you attempt to move them. Then, carefully transfer the warm cookies to a wire cooling rack to cool completely. Allowing them to cool fully will set the jam and prevent sticking. Serve these beautiful cookies and savor every bite!

STRAWBERRY THUMBPRINT COOKIES
Print
Pin
Rate
Ingredients
- 1 cup butter 2 sticks, at room temperature
- ⅔ cup granulated sugar
- 2 egg yolks
- 1 tsp vanilla extract
- 2 cups all-purpose flour
- ½ tsp salt
- ⅓ cup strawberry jam
Instructions
-
Prep: Preheat oven to 375 degrees F. Line a cookie sheet with parchment paper.
-
In a large mixing bowl, cream together the butter and sugar on medium-high speed with an electric mixer until light and fluffy. This should take about 2-3 minutes. Then, add in and beat the egg yolks and the vanilla extract.
-
Add the flour and salt. Mix together until incorporated and the dough comes together into a ball. If desired, chill the dough in the refrigerator for 30 minutes (this is optional).
-
Shaping: Form the dough into1-inch-sized balls that are perfectly round and then place them onto the prepared baking sheet. Using the backside of a ½ teaspoon measuring spoon, press an indent into the center of the cookies to create a crater.
-
Bake & Filling: Place the cookie sheet into the preheated oven and bake for 8-10 minutes.
-
Remove the baking sheet from the oven and if the indents look shallow, press them in again. Then, fill each indentation with a spoon full of strawberry jam.
-
Continue to bake in the oven for an additional 3-4 minutes or until the jam has melted slightly and the edges of the cookies are lightly golden in color. Let the cookies cool on the baking sheet for 5 minutes, then transfer to a cooling rack to cool completely. Serve and enjoy!
Notes
For longer storage, they can be frozen for up to 3 months. Thaw at room temperature before serving.
Nutrition
Exploring Delicious Variations of Thumbprint Cookies
Thumbprint cookies are incredibly versatile, offering endless possibilities for customization beyond the classic strawberry jam filling. Here are some popular variations you can explore to make these delightful treats truly your own:
Filling Variations: The center of the thumbprint cookie is where you can truly unleash your creativity. Here are some beloved filling ideas:
- Assorted Fruit Preserves: Beyond strawberry, classic fruit preserves are the quintessential filling. Explore flavors like tart raspberry, tangy apricot, sweet blueberry, or exotic fig for different seasonal delights. Each jam offers a unique burst of flavor and a beautiful color contrast against the buttery cookie.
- Rich Chocolate: For the chocolate lovers, fill the indent with melted dark, milk, or white chocolate. A decadent chocolate ganache or a spoonful of Nutella also makes for an incredibly rich and satisfying center, transforming these into chocolate thumbprint cookies.
- Creamy Caramel: Introduce a rich, buttery flavor by filling the thumbprint with homemade caramel or a high-quality store-bought caramel sauce. A sprinkle of sea salt on top of the caramel before baking creates a delightful salted caramel thumbprint cookie.
- Lemon Curd: For a bright and zesty twist, try filling your cookies with homemade or store-bought lemon curd. The tangy sweetness of the lemon provides a wonderful contrast to the buttery cookie dough.
- Cream Cheese Filling: A dollop of sweetened cream cheese filling (like in a mini cheesecake) can turn these into a decadent dessert, especially when topped with a fruit preserve swirl.
Dough Variations: The cookie dough itself can also be adapted to introduce new flavor dimensions:
- Decadent Chocolate Dough: Infuse your dough with rich cocoa powder to create a dark chocolate base. This pairs wonderfully with raspberry or cherry jam for a Black Forest-inspired treat.
- Fragrant Almond Dough: Enhance the dough with a teaspoon of almond extract or finely ground almonds (almond flour can substitute a small portion of the all-purpose flour) for a nutty, aromatic cookie. This variation complements fruit preserves beautifully.
- Warm Spice Dough: Introduce warm, comforting spices like cinnamon, ginger, nutmeg, or a pumpkin pie spice blend into the dough. These spiced cookies are perfect for autumn and pair well with apple butter or pumpkin caramel fillings.
- Citrus Zest Dough: Add grated lemon, orange, or lime zest to the dough for a bright, fresh flavor that works exceptionally well with corresponding citrus curds or berry jams.
Topping Variations: The final flourish can add both visual appeal and an extra layer of texture:
- Crunchy Chopped Nuts: Sprinkle finely chopped nuts such as pecans, walnuts, or almonds over the jam filling before or after baking for an added crunch and nutty flavor.
- Delicate Powdered Sugar: For a simple yet elegant finish, dust the cooled cookies with a light coating of powdered sugar. This adds a touch of sweetness and a beautiful visual appeal.
- Sweet Glaze or Drizzle: Drizzle a simple glaze made from powdered sugar and milk (or lemon juice for a zesty kick) over the cooled cookies. This adds a lovely sheen and another layer of sweetness.
- Coconut Flakes: Toasted coconut flakes sprinkled around the edges or on top of the jam provide a tropical twist and pleasant chewiness.
How to Store Thumbprint Cookies for Optimal Freshness
To maintain the delightful taste and texture of your homemade thumbprint cookies, proper storage is key. You should keep these cookies in a single-layer, airtight container at room temperature for up to 5 days. If you need to stack them, always place a piece of parchment paper or wax paper between the layers. This crucial step prevents the bottoms of the upper cookies from sticking to the jam centers of the cookies below, which can happen if the jam is still slightly tacky. While they are enjoyable for up to a week, for the absolute best flavor and texture, we highly recommend savoring them within about 3 or 4 days of baking, when they are at their freshest and most tender.

Troubleshooting: Why Are My Thumbprint Cookies Falling Apart?
If you find your thumbprint cookies crumbling or falling apart, there could be a few common culprits. One primary reason might be that your cookie dough was too dry or crumbly to begin with. This can happen if you added too much flour or not enough liquid/fat. To remedy this, try adding a tiny bit more softened butter or an extra egg yolk to the dough, mixing just until it comes together. Another significant factor is overbaking. Cookies that spend too long in the oven will dry out excessively, becoming brittle and prone to breakage. Always keep a close eye on your cookies while they are baking; they should be lightly golden at the edges, but still soft in the center when removed from the oven. They will continue to firm up as they cool.
Addressing the Issue: Why Did My Cookies Spread Too Much?
Excessive spreading is a common issue with shortbread-style cookies like thumbprints. If your cookies spread out more than desired while baking, the most likely cause is that your dough was too warm. This can happen easily if your kitchen is particularly warm, or if your butter was overly softened when you started mixing the dough. When butter is too warm, it melts too quickly in the oven before the cookie structure has a chance to set, leading to flat, thin cookies. The good news is this is an easy fix! Simply place your formed cookie dough balls (or the entire batch of dough) into the freezer for about 30 minutes to an hour before baking. This rapid chilling will re-solidify the butter, helping the cookies hold their shape much better in the oven and resulting in perfectly shaped, tender strawberry thumbprint cookies.
Can I Prepare the Cookie Dough in Advance?
Absolutely! Making the cookie dough in advance is a fantastic time-saver, especially when preparing for parties or busy occasions. You can prepare the dough and store it in a well-covered bowl or wrapped tightly in plastic wrap in the refrigerator for up to a day. This allows you to bake fresh cookies without spending too much time in the kitchen on the day of your event. Just let the dough sit at room temperature for about 10-15 minutes to soften slightly before rolling and shaping, or you might choose to give it a quick chill in the freezer if it feels too soft after sitting out.

The Importance of Chilling Cookie Dough (Even When Optional!)
While we offer chilling as an optional step in this recipe, it’s worth understanding why many cookie recipes recommend it and the benefits it provides. When you chill cookie dough, you’re essentially allowing the butter (or other fats) within the dough to re-solidify. This is crucial because colder butter melts more slowly in the hot oven, giving the cookie’s structure more time to set before it spreads. The result is a cookie that holds its shape better, preventing excessive spreading and ensuring a thicker, more tender texture. Additionally, chilling allows the flour to fully hydrate and the flavors in the dough to meld and deepen, leading to an even more incredible taste. This step is particularly beneficial on warmer days or if your butter was initially very soft, ensuring your homemade jam thumbprint cookies turn out perfectly every time.

Just like these classic cookies, some things are built to last and bring joy across generations! My husband and his Dad share a passion for restoring old cars. They’ve lovingly worked on a sleek Chevelle, a vibrant ’66 red Mustang, and most recently, added this beautiful ’66 Corvette to their impressive collection. It might be small, but it’s incredibly fast and boasts a wonderfully loud engine, which the kids absolutely adore! And you know what? That iconic red Corvette perfectly complements the cheerful, strawberry red color of these delightful cookies, doesn’t it? It’s all about enjoying the simple pleasures and creating cherished memories.

Discover More Delicious Thumbprint Cookie Recipes to Try:
- Creamy Cheesecake Thumbprint Cookies
- Sweetheart Valentine Thumbprint Cookies
- Whimsical Grinch Thumbprint Cookies
- Effortless, Soft Jam Thumbprint Cookies (A timeless classic)
- Tangy Raspberry Jam Thumbprint Cookies
- Gourmet Salted Pumpkin Caramel Thumbprint Cookies
- Charming Double Thumbprint Heart Cookies
- Decadent Chocolate Strawberry Thumbprint Cookies
- Bright and Zesty Lemon Thumbprint Cookies
- Rich Caramel Thumbprint Cookies
- Classic Strawberry Thumbprint Cookies (Our featured recipe!)
- Indulgent Chocolate Raspberry Thumbprint Cookies
In conclusion, these Strawberry Thumbprint Cookies offer a delightful escape into a world of fluffy, buttery, and melt-in-your-mouth shortbread perfection. These beloved thumbprint cookies with jam are not only simple to prepare with just a few pantry staples but also come together quickly, making them an absolutely incredible treat for any time of year. Their irresistible combination of tender cookie and sweet fruit makes them a guaranteed crowd-pleaser and a joy to bake.

