Authentic Copycat Wendy’s Chili Recipe: Recreate the Classic Flavor at Home
This homemade Wendy’s Chili recipe is a perfect replica of the beloved fast-food classic. It’s bursting with rich, savory flavor thanks to a balanced blend of ground beef, two types of beans, green chilies, chili powder, and cumin. Experience the nostalgic taste you love, made fresh in your own kitchen!

There’s something truly special about a bowl of chili, especially when it evokes warm childhood memories. For me, Wendy’s chili holds a particular place in my heart, reminding me of cherished moments spent with my grandmother. Whether it was her favorite budget-friendly choice or simply a delicious treat we both enjoyed, those trips to Wendy’s for chili are etched in my memory. Now, every time I prepare this recipe, I’m transported back to those fond times, savoring not just the taste but the sentiment behind it.
Perhaps you also have your own nostalgic connection to Wendy’s chili and are looking for a way to enjoy that familiar taste with the added benefits of home cooking. This copycat recipe allows you to recreate that iconic flavor, giving you complete control over the ingredients for a healthier, preservative-free version. It’s a satisfying and hearty meal that’s perfect for chilly evenings or any time you crave a comforting, flavorful dish.
Why You’ll Love This Authentic Wendy’s Chili Recipe
This isn’t just another chili recipe; it’s designed to bring you the authentic taste of Wendy’s right to your dining table. Here’s why this recipe will quickly become a family favorite:
- The BEST Copycat Flavor: We’ve meticulously crafted this recipe to replicate the distinctive taste of Wendy’s chili. From the savory ground beef to the perfect balance of spices like chili powder and cumin, along with two types of beans and a hint of green chilies, every spoonful delivers that unmistakable flavor you know and love. You’ll be amazed at how accurately it mirrors the restaurant version, making it an incredibly satisfying homemade experience.
- Incredibly Easy to Make: Don’t let the authentic flavor fool you – this chili is surprisingly simple to prepare. Whether you prefer the traditional stovetop method for a classic simmer, the convenience of a slow cooker (crockpot) for hands-off cooking, or the speed of an Instant Pot for busy weeknights, this versatile recipe adapts effortlessly to your preferred cooking style. It’s perfect for both novice and experienced cooks.
- Budget-Friendly & Freezer-Friendly: Making chili at home is not only delicious but also a smart way to manage your food budget. This recipe utilizes common, affordable ingredients that pack a huge flavor punch without breaking the bank. Plus, it’s exceptionally freezer-friendly, allowing you to whip up a large batch and store it for future meals. Having a ready-to-go, homemade chili in your freezer means a last-minute dinner solution that’s both healthy and delicious, often tasting even better after the flavors have had more time to meld.
FREE Budget-Friendly Meal Plan!
Save thousands of dollars on food every year with my free budget-friendly meal plan ebook.

Key Ingredients and Smart Substitutions for Your Wendy’s Chili
Crafting the perfect Wendy’s copycat chili starts with understanding each ingredient’s role and knowing how to adapt. Here’s a detailed look at what you’ll need and flexible substitutions:
- Extra-lean ground beef: This forms the hearty base of our chili. Using extra-lean beef reduces fat without compromising flavor. For a lighter option, consider ground turkey or chicken, which will alter the flavor slightly but still create a delicious chili. If you prefer a richer, more textural chili, sirloin chunks can be used, just ensure they are browned well and cooked until tender.
- Yellow onion: A foundational aromatic that adds sweetness and depth. Red onion can provide a sharper flavor, while shallots offer a milder, more delicate sweetness. All work beautifully in this recipe.
- Celery: Contributes a subtle, earthy crunch and freshness. If you don’t have celery on hand, don’t worry – the chili will still be flavorful without it, though it adds a classic depth to the aromatic base.
- Green pepper: Adds a fresh, slightly bitter note that balances the richness of the chili. Any color of bell pepper (red, yellow, orange) can be used, offering varying degrees of sweetness and visual appeal.
- Canned green chilies: These are crucial for that authentic Wendy’s flavor, providing a mild, tangy heat without being overly spicy. If unavailable, fresh or pickled jalapeños, finely diced, make excellent substitutes for a similar flavor profile and a customizable level of heat.
- Worcestershire sauce: A secret weapon for umami depth! It adds a complex, savory, and slightly tangy note that enhances the overall flavor of the beef. While optional, it’s highly recommended for achieving that true copycat taste.
- Chili powder: The primary spice that defines chili. Use a high-quality blend for best results. If you need a substitute, combine ground cumin, paprika (sweet or smoked), and a pinch of cayenne pepper for a similar flavor profile.
- Sugar: Just a touch of sugar helps to balance the acidity of the tomatoes and enhances the overall sweetness of the chili, rounding out the flavors. Brown sugar, honey, or maple syrup can all be used interchangeably to achieve this balance.
- Cumin: This warm, earthy spice is indispensable for authentic chili flavor. Ground coriander is the best substitute if you’re out of cumin, as it offers a similar citrusy-earthy aroma, though it will taste slightly different.
- Onion powder: Boosts the savory onion flavor throughout the dish. In a pinch, garlic powder can be used as a substitute, especially if you’re already using fresh garlic in the recipe.
- Paprika: Adds a lovely red color and a mild, sweet pepper flavor. Smoked paprika can add an extra layer of depth. Cayenne pepper can substitute for paprika if you want to increase the heat significantly.
- Garlic: Freshly minced garlic provides the most potent and aromatic flavor. However, jarred minced garlic is a convenient alternative and works well when time is short.
- Kidney and pinto beans: These two types of beans are characteristic of Wendy’s chili, providing texture, protein, and a subtle sweetness. Black beans, white beans (like cannellini or navy beans), chickpeas, or even lentils can be used for variation, each contributing a slightly different texture and flavor. Ensure beans are drained and rinsed before adding.
- Crushed tomatoes: The crushed tomatoes form the rich, tangy base of the chili sauce. Canned diced tomatoes or stewed tomatoes can be used as alternatives, though you might want to break them down a bit with a spoon during simmering for a smoother consistency.
- Beef broth: Provides the liquid base and enhances the beefy flavor. Chicken or vegetable broth can be used, but be aware that the overall flavor profile of the chili will be subtly different, potentially less rich and savory.
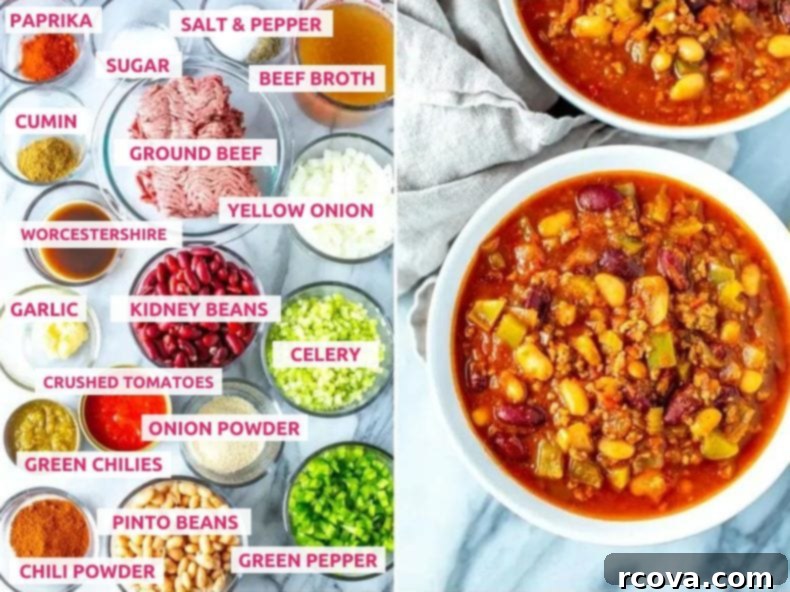
Step-by-Step Guide: How to Make Wendy’s Chili at Home
Making this hearty copycat chili is a straightforward process that yields incredible results. Follow these simple steps for a comforting meal that tastes just like the original.

Step 1: Assemble Your Ingredients (Mise en Place)
Before you begin cooking, it’s essential to gather and prepare all your ingredients. This practice, known as “mise en place,” ensures a smooth and efficient cooking process. Dice your onions, celery, and green pepper, mince your garlic, and have all your canned goods and spices measured out and ready. This step saves time and reduces stress once you start cooking, allowing you to focus on building those delicious layers of flavor.
Step 2: Brown the Ground Beef to Perfection
Start by heating a large pot or Dutch oven over medium-high heat. Add your extra-lean ground beef to the hot pot, breaking it up with a spoon as it cooks. Brown the beef thoroughly for about 3-4 minutes until no pink remains. This browning step is crucial as it creates a rich, savory depth through the Maillard reaction. Once browned, drain any excess fat from the pot to keep your chili lean and flavorful.
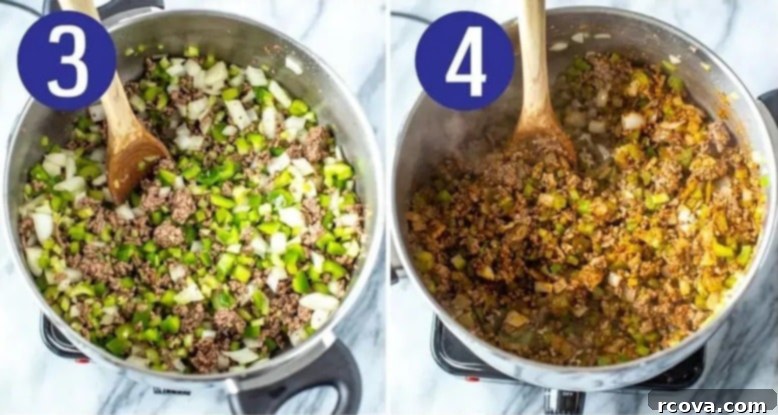
Step 3: Build the Flavor Base with Sautéed Veggies
After browning the beef, add the diced onions, celery, and green pepper to the pot. Sauté these vegetables with the beef for another 2-3 minutes, stirring occasionally, until they begin to soften and become translucent. This step helps to release their natural sweetness and aromatic compounds, creating a robust foundation for your chili.
Step 4: Toast Your Seasonings for Enhanced Aroma
Now, it’s time to introduce the powerful spice blend! Stir in the green chilies, Worcestershire sauce, chili powder, sugar, cumin, onion powder, paprika, salt, pepper, and minced garlic. Continue to sauté for 1-2 minutes, stirring constantly, until the spices become wonderfully fragrant. Gently toasting the spices in the hot pot unlocks their full aroma and deepens their flavor, making them shine in the final dish.

Step 5: Simmer to Perfection for Deep Flavor
Add the drained kidney and pinto beans, crushed tomatoes, and beef broth to the pot. Stir all the ingredients together thoroughly, ensuring everything is well combined. Bring the mixture to a rolling boil, then reduce the heat to low, cover the pot with a fitted lid, and let it simmer for at least 30 minutes. Stir the chili occasionally to prevent sticking and ensure even cooking. Simmering allows all the flavors to meld beautifully, creating a rich and complex chili that tastes like it’s been cooking all day.
Step 6: Customize and Serve with Your Favorite Toppings
Once the chili has simmered and thickened to your desired consistency, it’s ready to be served. Ladle generous portions into bowls and let everyone customize their chili with their favorite toppings. This is where you can truly make it your own! Enjoy your deliciously homemade Wendy’s copycat chili!

Tips & Creative Variations for Your Wendy’s Chili
This Wendy’s copycat chili recipe is fantastic as is, but it’s also incredibly versatile! Here are some tips and variations to customize it to your liking and truly make it your own:
- Achieve Thicker Chili: If you prefer a heartier, thicker chili, there are a couple of methods. You can mash some of the beans directly in the pot with a fork or potato masher; their starch will naturally thicken the stew. Alternatively, simply let the chili simmer uncovered for a longer period, allowing more of the liquid to reduce and intensify the flavors.
- Control the Heat Level: The beauty of homemade chili is being able to adjust the spice to your preference. For more kick, incrementally add extra chili powder, a dash of cayenne pepper, or more diced fresh or pickled jalapeños. If you like it really spicy, a pinch of red pepper flakes or a few dashes of your favorite hot sauce can elevate the heat. For a milder chili, you can reduce the amount of chili powder or omit the green chilies entirely.
- Infuse Smoky Flavors: To give your chili a wonderful smoky depth, incorporate smoked paprika (in addition to or instead of regular paprika) or a small amount of finely chopped chipotle peppers in adobo sauce. These ingredients add a rich, barbecue-like aroma that complements the robust beef flavor.
- Make it Extra Cheesy: Stirring in shredded cheddar cheese directly into the pot just before serving adds an incredible creaminess and richness. For an even more decadent experience, top each serving with a generous dollop of cream cheese or a mix of Monterey Jack and cheddar cheese.
- Experiment with Toppings: Toppings are essential for the full chili experience! Garnish your chili with classic favorites like shredded sharp cheddar cheese, crunchy crushed corn chips or Fritos, crispy bacon crumbles, fresh avocado slices for creaminess, fire-roasted corn for sweetness, a dollop of cooling sour cream, thinly shredded lettuce for a fresh bite, bright green onions, or an extra splash of hot sauce for those who crave more heat.
- Vegetarian Adaptation: For a meatless version, swap the ground beef for plant-based ground “meat” or a mix of mushrooms and lentils. Use vegetable broth instead of beef broth.
- Slow Cooker or Instant Pot Optimization: Even if you’re making this on the stovetop, remember you can adapt it. For the slow cooker, brown the beef and sauté the aromatics first, then combine everything and cook on low for 6-8 hours or high for 3-4 hours. For the Instant Pot, use the sauté function to brown the beef and vegetables, then pressure cook for 10-15 minutes with a natural release for a quick, tender result.
Frequently Asked Questions About Wendy’s Copycat Chili
Is this homemade Wendy’s chili recipe healthy?
One of the biggest advantages of making chili at home is controlling the ingredients, which often results in a healthier dish. Without any additional toppings, a single serving of this recipe contains approximately 255 calories. In comparison, a small serving of Wendy’s restaurant chili is around 240 calories, while a large one is about 330 calories. Our homemade version is likely a more substantial serving size with a higher protein content (23g per serving), offering great satiety. More importantly, it contains no artificial preservatives or chemicals, giving you a fresh and wholesome meal. You can further enhance its health benefits by opting for ground turkey or chicken, adding more vegetables, or reducing the amount of added sugar.
Can I make this chili in a crockpot or an Instant Pot?
Absolutely! This recipe is incredibly versatile and adapts well to different cooking methods:
- For the Crockpot (Slow Cooker): First, brown the ground beef in a skillet on the stovetop. Once browned, add the beef to your crockpot along with all the remaining ingredients. Cook on high for 4 hours or on low for 8 hours. The slow cooking process allows the flavors to meld beautifully, creating a tender and deeply flavorful chili.
- For the Instant Pot: Use the “Sauté” function on your Instant Pot to brown the ground beef. Once browned, add the diced vegetables (onions, celery, green pepper) and continue to sauté until they begin to soften. Stir in the spices until fragrant. Then, add the remaining ingredients (beans, crushed tomatoes, beef broth). Secure the lid, set the valve to “Sealing,” and cook on high pressure for 10-15 minutes. Once the cooking cycle is complete, perform a quick release of the pressure. This method offers a delicious chili in a fraction of the time.
How do I thicken the chili if it’s too thin?
If your chili turns out thinner than you’d prefer, there are several easy ways to thicken it:
- Mash some beans: A classic method is to simply mash a portion of the beans directly in the pot using a fork or potato masher. The starches from the mashed beans will naturally absorb liquid and thicken the chili.
- Simmer longer: For a more natural reduction, remove the lid and let the chili simmer gently for an additional 15-30 minutes. This allows the excess liquid to evaporate, concentrating the flavors and thickening the consistency.
- Add a cornstarch slurry: For a quick fix, mix 1-2 tablespoons of cornstarch with an equal amount of cold water to create a slurry. Stir this mixture into the simmering chili and cook for another 2-3 minutes until thickened.
- Add tomato paste: A tablespoon or two of tomato paste can add both flavor and thickness.
What kind of beans are typically used in Wendy’s chili?
Wendy’s chili is known for using a combination of kidney beans and pinto beans. This recipe follows that tradition, as these two types of beans offer a great balance of texture, flavor, and heartiness, contributing to the chili’s authentic taste and satisfying consistency.

Storing, Freezing, and Reheating Your Homemade Chili
This Wendy’s copycat chili is fantastic for meal prepping and enjoying throughout the week. Here’s how to best store, freeze, and reheat it:
- Storing Leftovers: Any leftover chili can be stored in airtight containers in the refrigerator for up to 5 days. Ensure it has cooled completely before transferring it to containers to maintain freshness and prevent bacterial growth.
- Freezing for Longer Storage: Chili freezes exceptionally well! Transfer cooled chili into freezer-safe airtight containers or heavy-duty freezer bags. It can be safely frozen for up to 3 months. For easy portioning, consider freezing individual servings. When ready to use, defrost the chili in the refrigerator overnight.
- Reheating Instructions:
- From the fridge: Reheat individual portions on the stovetop over medium heat, stirring occasionally, until heated through (about 5-7 minutes). Alternatively, microwave for 1-2 minutes, stirring halfway through. Add your favorite toppings after reheating.
- From frozen: For best results, thaw in the refrigerator first. If reheating directly from frozen, microwave for 6-7 minutes, stirring thoroughly halfway through, until piping hot. On the stovetop, place frozen chili in a pot with a splash of broth or water, cover, and heat on low, breaking it up as it thaws, then simmer until hot.
- Repurposing Leftovers: Don’t let any delicious chili go to waste! Leftover chili is incredibly versatile and can be repurposed into a variety of exciting dishes. Use it to make loaded chili cheese fries, a vibrant taco salad, hearty loaded baked potatoes, or a comforting chili mac and cheese. The possibilities are endless!

More Fast Food Copycat Recipes You’ll Love
Craving more of your fast-food favorites made better at home? Check out these other delicious copycat recipes!
-
Wendy’s Spicy Chicken Sandwich
-
Copycat Taco Bell Nacho Fries
-
Wendy’s Taco Salad {Perfect Copycat!}
What to Serve with Your Hearty Wendy’s Chili Recipe
While this copycat chili is incredibly filling and satisfying on its own, pairing it with the right side dishes can elevate your meal into a truly memorable feast. Here are some fantastic ideas for what to serve alongside your homemade chili:
- Crispy Sweet Potato Fries: A batch of perfectly seasoned sweet potato fries offers a delightful contrast in texture and a touch of sweetness that complements the savory chili beautifully. The air fryer makes them extra crispy and a healthier alternative to traditional fries.
- Fresh and Vibrant Side Salad: Cut through the richness of the chili with a light and refreshing side salad. A simple green salad or a more elaborate one like this Brussels sprouts salad can add a crucial element of freshness and a welcome crunch to your meal.
- Warm and Crumbly Cornbread: A classic pairing for chili, a warm slice of cornbread is perfect for soaking up every last bit of the flavorful sauce. Whether you prefer it sweet or savory, homemade cornbread adds a comforting, wholesome touch that makes the meal feel complete.
- Crusty Bread or Dinner Rolls: If cornbread isn’t your preference, a good crusty bread or soft dinner rolls are also excellent for dipping and wiping your bowl clean.
- Rice or Quinoa: For an even more substantial meal, serve your chili over a bed of fluffy white rice, brown rice, or quinoa. This is a great way to stretch the meal further and add another layer of texture.
- Tortilla Chips: Crunchy tortilla chips are not only a great topping but also a fantastic side for dipping directly into the chili, adding a salty crunch to every bite.
Essential Meal Prep Tools for Chili Enthusiasts
To make your chili-making and meal-prepping experience as smooth and enjoyable as possible, consider investing in these helpful tools:
- Glass Meal Prep Bowls: If you plan on storing and reheating your delicious chili leftovers throughout the week, a set of durable glass meal prep bowls is indispensable. They are microwave-safe, oven-safe, and perfect for keeping your food fresh.
- High-Quality Ground Beef Source: The foundation of great chili is great beef. I source all my grass-fed ground beef from Butcher Box. Their convenient delivery service ensures I always have high-quality, humanely raised meat readily available in my freezer.
- Souper Cubes for Freezing: For easy portion control and convenient freezing, Souper Cubes are a game-changer. These silicone trays allow you to freeze chili in perfect individual portions, making it effortless to grab just what you need without thawing the entire batch. They’re ideal for freezing this recipe for up to 3 months.
- Large Dutch Oven or Stockpot: A sturdy, heavy-bottomed pot is essential for browning the meat and simmering the chili evenly on the stovetop. It helps prevent scorching and ensures consistent heat distribution for the best flavor development.
- Instant Pot or Slow Cooker: If you’re looking to save time or prefer a hands-off approach, an Instant Pot or a slow cooker (crockpot) is a fantastic addition to your kitchen arsenal, as this recipe can be easily adapted for both.

Wendy’s Copycat Chili Recipe
Print
Pin
Rate
SEND ME MY PLAN
Ingredients
- 1 lb extra-lean ground beef
- 1 yellow onion, diced
- 3 stalks celery, diced
- 1 green pepper, diced
- 1 (127mL) can green chilies
- 1 tbsp Worcestershire sauce
- 1 tbsp chili powder
- 2 tsp sugar
- 1 tsp cumin
- 1 tsp onion powder
- 1 tsp paprika
- 1/2 tsp each salt & pepper
- 2 cloves garlic, minced
- 1 (540mL) can kidney beans, drained
- 1 (540mL) can pinto beans, drained
- 1 (796mL) can crushed tomatoes
- 2 cups beef broth
Instructions
-
Heat a large pot over med-high heat. Add ground beef, breaking up and browning for 3-4 minutes. Add onions, celery and green pepper, sauteeing another 2-3 minutes until softened.
-
Stir in green chilies, Worcestershire, chili powder, sugar, cumin, onion powder, paprika, salt & pepper and garlic, sauteeing for 1-2 minutes until fragrant.
-
Stir in beans, crushed tomatoes and beef broth, then bring to a boil. Once boiling, reduce heat and simmer for 30 minutes with a fitted lid, stirring chili occasionally.
-
Serve with desired toppings and enjoy!
Video
Notes
Use homemade or store-bought taco seasoning instead of chili powder, cumin, onion powder and paprika.
Store the leftovers in the fridge for up to 5 days. Reheat in a pan on the stovetop or in the microwave for 1-2 minutes.
Freeze this recipe for up to 3 months. Reheat from frozen for 6-7 minutes in the microwave or defrost then reheat as normal.
Nutrition


